Apple Crisp Mini Cheesecakes
This post may contain affiliate links, read my disclaimer.
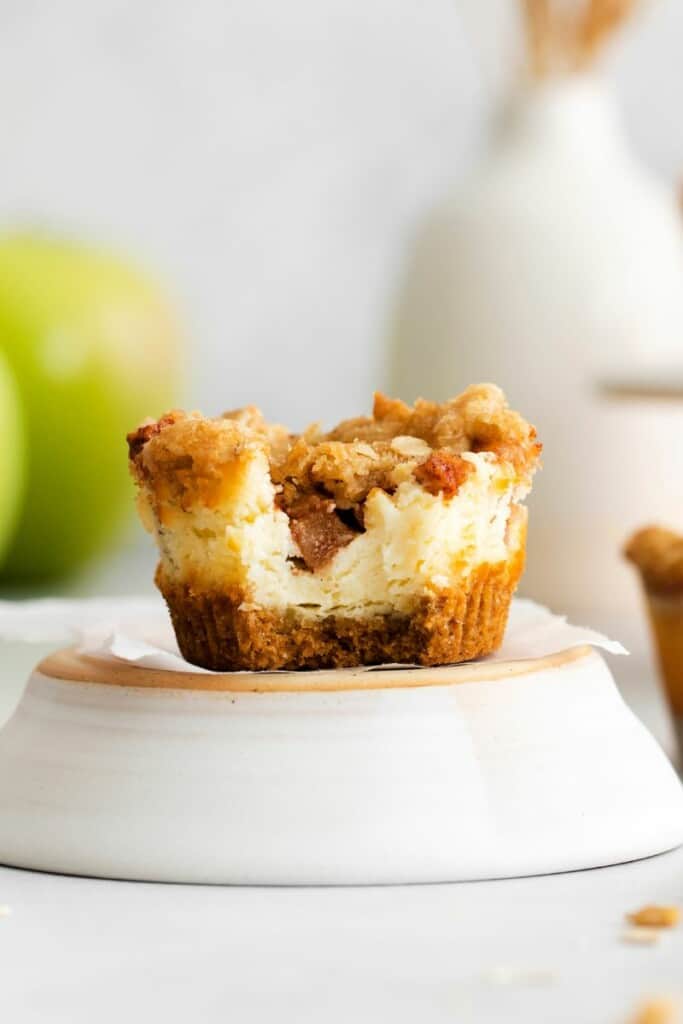
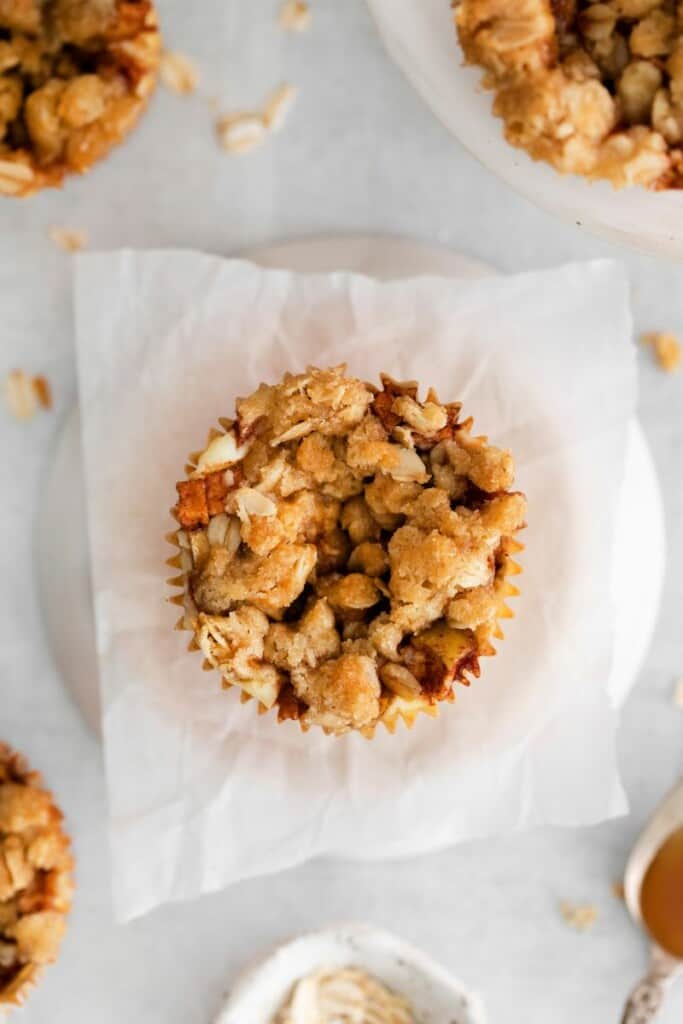
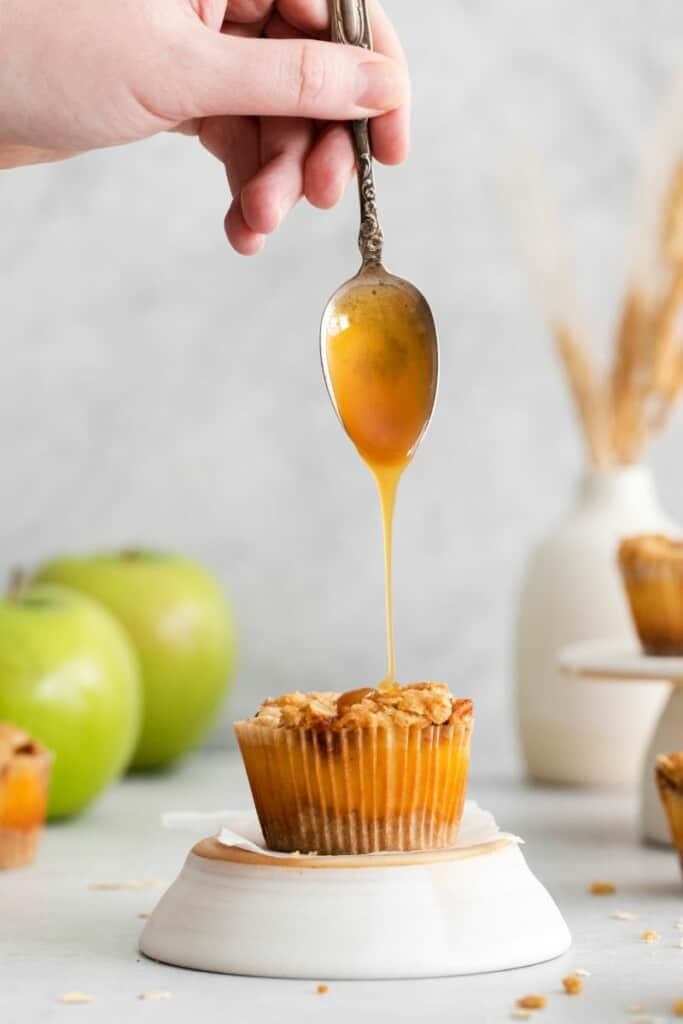
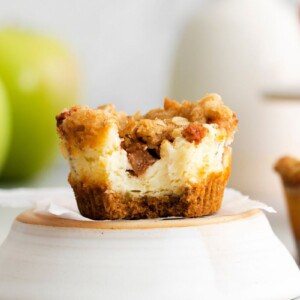
These apple crisp mini cheesecakes are divinely decadent. Cool creamy cheesecake filling is topped with sweet apple crisp and infused with the flavors of fall to create a truly heavenly dessert.
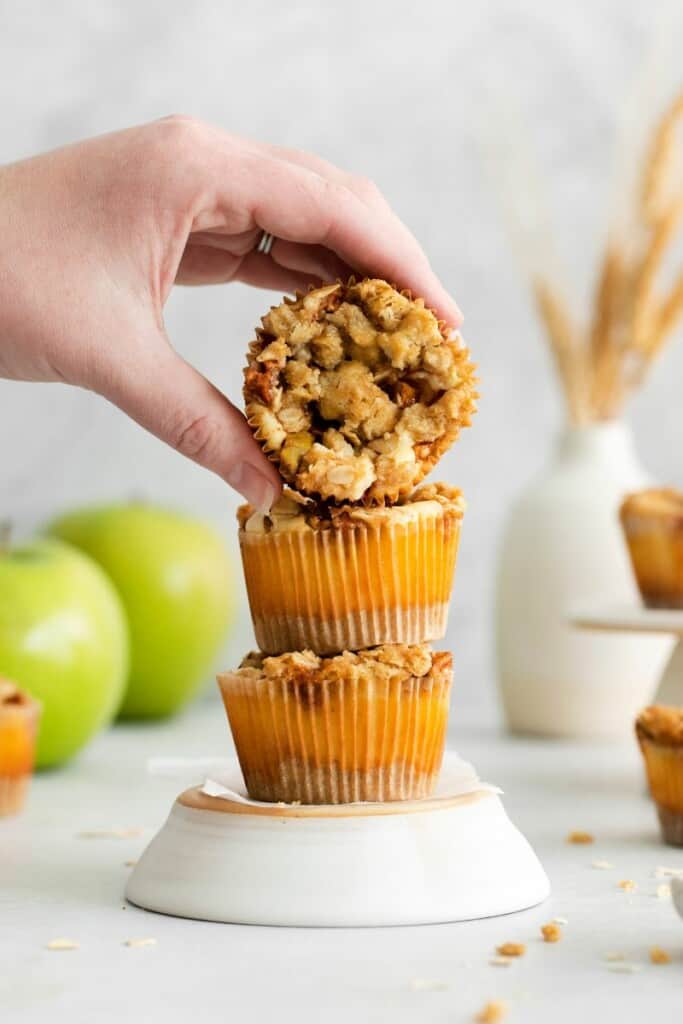
This mini cheesecake recipe combines two classic dessert recipes into one magnificent bite.
The combination of satiny smooth cheesecake with spiced-sweet apple crisp is hard to beat.
Once you make these apple crisp mini cheesecakes for your friends and family, they will ask for them again and again.
You definitely don’t need to wait until autumn to make this recipe, though. It is perfect year-round and for literally any occasion. Nobody will complain about cheesecake!
No apples on hand? No problem! This recipe is customizable and can be made with any fruit you choose.
Apples, berries, peaches, cherries…..any of these would be delicious in this mini cheesecake recipe. Have fun and let us know if you try any variations!
Here’s what I’m going to teach you in this post:
- Everything you need to make this mini cheesecake recipe.
- Step by step instructions for making apple crisp mini cheesecakes.
- Expert tips to help your apple crisp cheesecake come out great.
These apple crisp mini cheesecakes are sure to be a new favorite. Bust out that muffin tin and let’s make some magic!
How to Make Apple Crisp Mini Cheesecakes
A full printable version of this recipe with ingredient measurements is available at the bottom of this post.
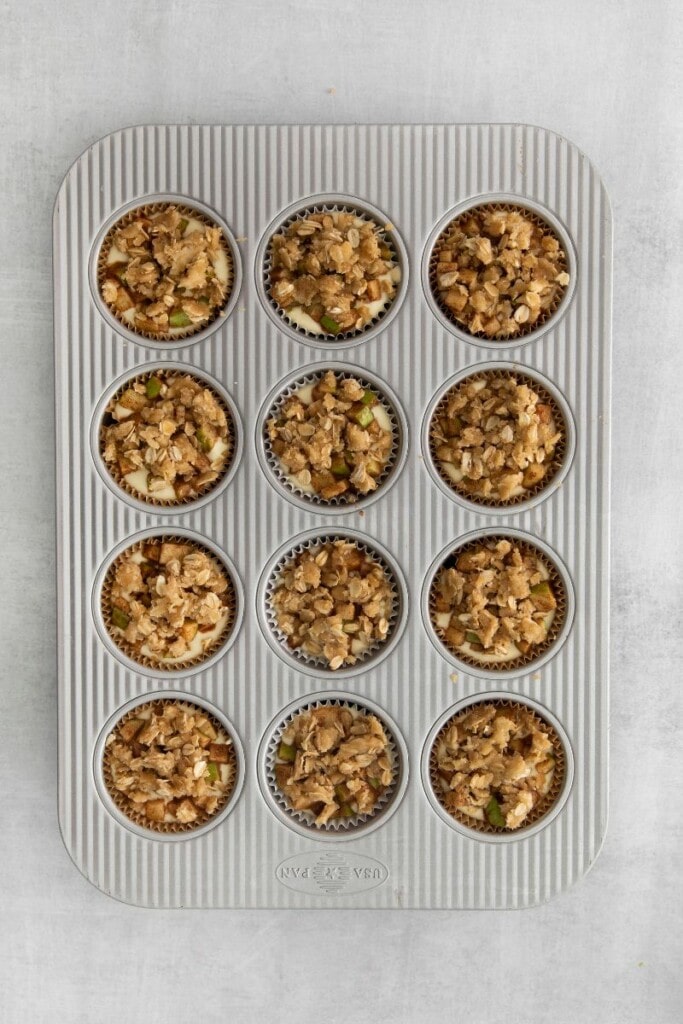
STEP ONE: Line a standard muffin tin with paper liners and preheat your oven to 350 degrees F.
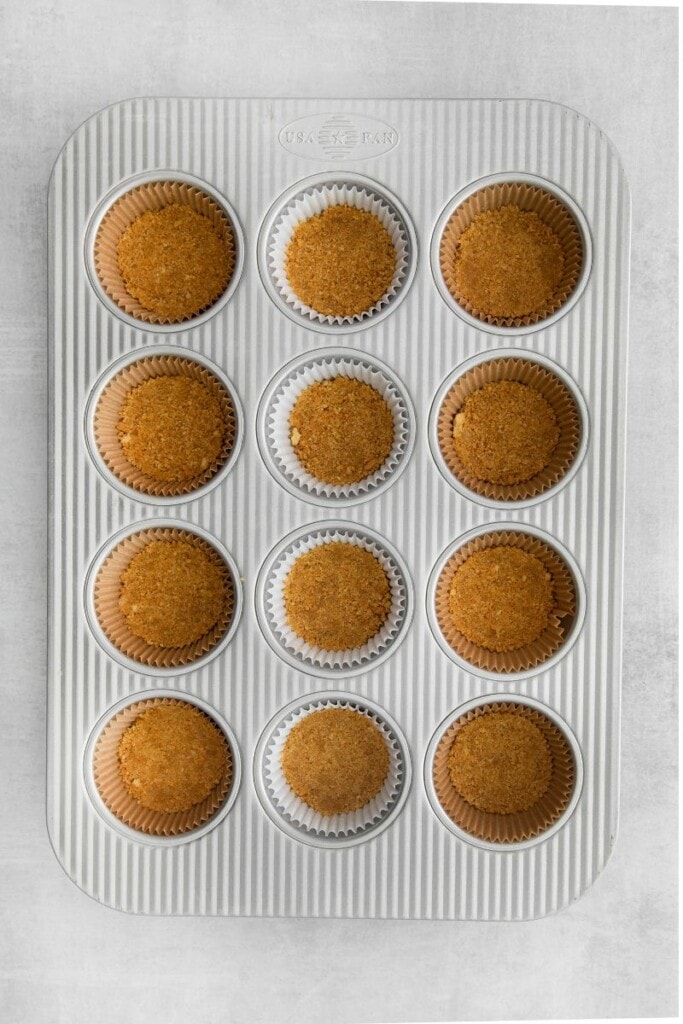
STEP TWO: Mix graham cracker crumbs and sugar together in a medium bowl. Mix in the melted butter until the mixture resembles wet sand. Spoon a bit of the mixture into each muffin tin, press down, and set aside.
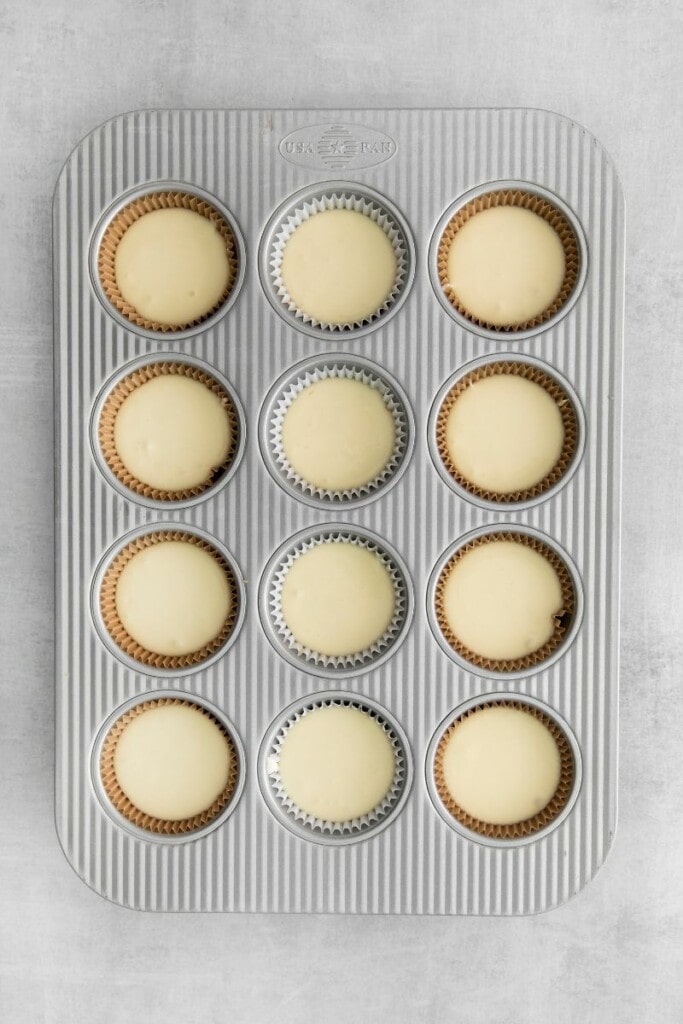
STEP THREE: Cream together the flour, sugar, cream cheese, and vanilla in a large bowl until light and fluffy. Add in eggs one at a time, mixing thoroughly and scraping down the sides of the bowl in between each egg. Once thoroughly mixed, evenly divide the mixture in the muffin tins, filling each one about ¾ full. Set aside.
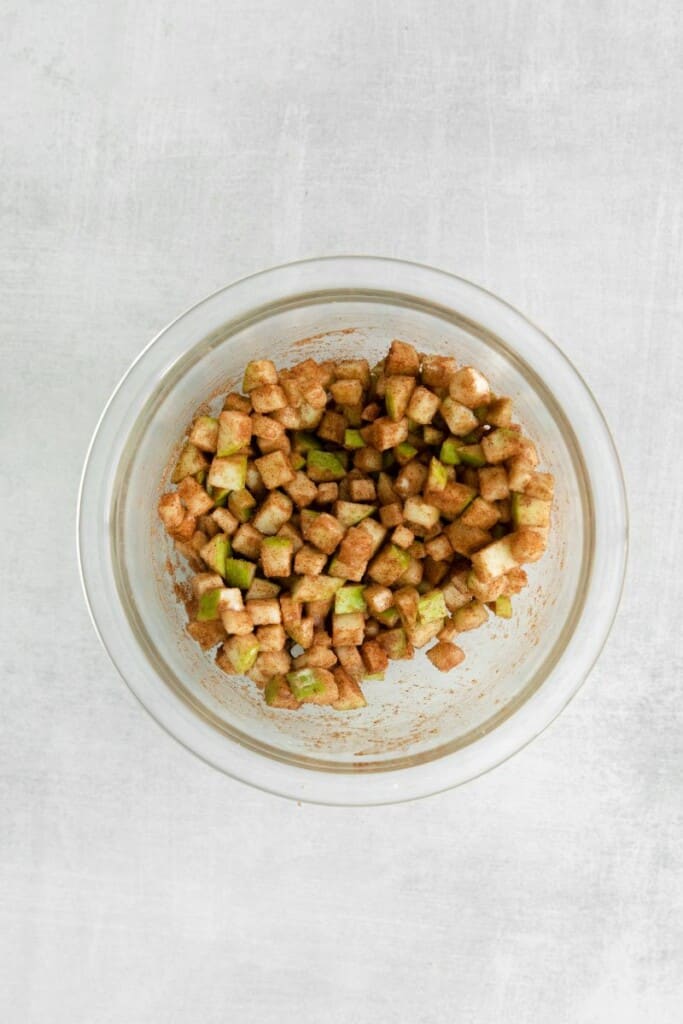
STEP FOUR: For the apple crisp layer, use a medium bowl to combine the apples, lemon juice, sugar, cornstarch, and cinnamon. Add a spoonful of this mixture to each muffin tin.
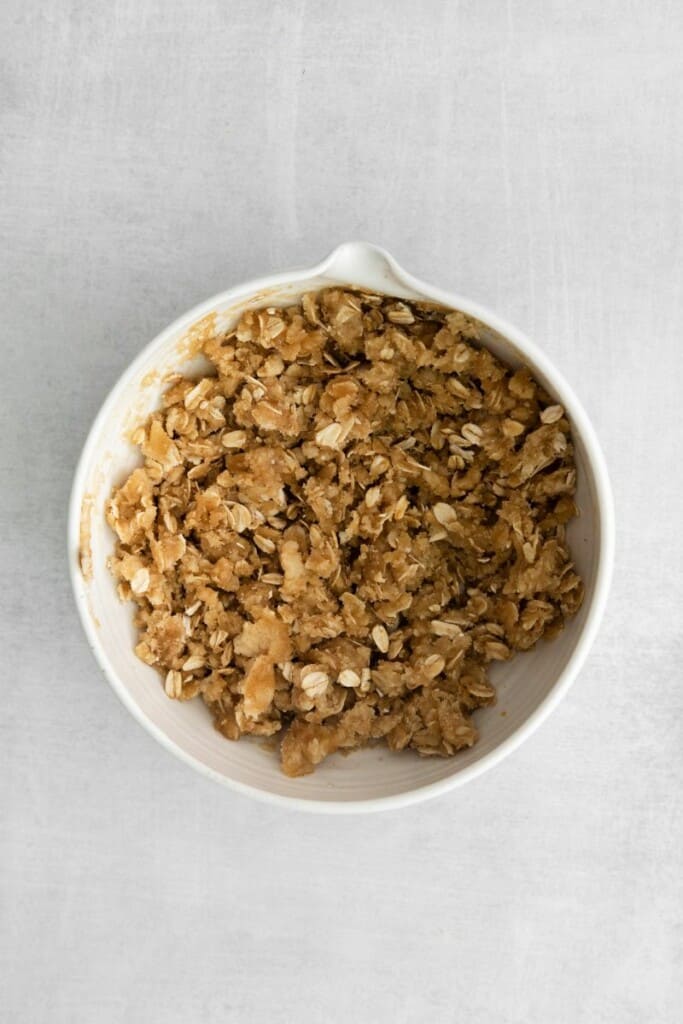
STEP FIVE: Use a small bowl to combine the brown sugar, oats, and flour before adding the melted butter to form a crumble. Add about 2 teaspoons of crumble to each cheesecake.
STEP SIX: Bake your mini cheesecakes for about 38-40 minutes or until the top layer is starting to turn golden.
STEP SEVEN: Remove the cheesecakes from the oven and leave them in the pan to cool completely. Once cooled, transfer the entire pan to the refrigerator for at least 4 hours before enjoying.
How Can I Customize This Mini Cheesecake Recipe?
Whether you have dietary restrictions, are missing an ingredient, or simply want to be creative, this mini cheesecake recipe is perfectly versatile. For example:
- Use ginger snaps instead of graham crackers for the crust.
- Use apple pie or pumpkin spice in place of cinnamon.
- Change up the fruit by adding a few berries or your favorite fruit of your choice. Peaches and cherries are some of my favorite options.
- Make the recipe gluten-free by switching to gluten free all-purpose flour, oats, and graham crackers.
How Far in Advance Can You Make Apple Crisp Cheesecake?
This mini cheesecake recipe is simple but it does have quite a few steps. If you need to get ahead of the game, no worries.
These apple crisp mini cheesecakes can be made 1-2 days in advance if stored in the refrigerator in an airtight container.
I like to make the crust a day or so in advance. It’s an easy way to get ahead and makes a big difference in a time crunch.
Tips for Making the Best Ever Apple Crisp Mini Cheesecakes
For the best apple crisp cheesecake, be sure to:
- Use full-fat cream cheese for the best flavor and texture.
- Use room temperature ingredients for smooth incorporation.
- Mix well, but don’t overmix.
- Choose Granny Smith or Honeycrisp apples.
- Use rolled or quick oats but not instant.
How Do I Store Leftover Apple Crisp Cheesecake?
If you end up with leftovers, storage is simple. Your apple crisp mini cheesecakes will last for 3-5 days in the refrigerator.
The more airtight your storage container, the longer your dessert will keep.
You can also freeze any leftovers for up to a month. I highly recommend this if you are a fan of frozen treats.
Slightly frozen cheesecake is one of life’s great pleasures. Serve it up with a scoop of vanilla ice cream if you want to get really decadent.
You’re going to love it!
Other Cheesecake Recipes You’ll Love:
- Apple Cobbler
- Cookies and Cream Cheesecake Mousse Dessert
- Apple Crumble Cheesecake
- Raspberry Cheesecake Cookies
- Oreo Cheesecake Cookies
- No Bake Cheesecake with Condensed Milk
- Red Velvet Oreo Cheesecake
- 5 Ingredient No-Bake Cheesecake
- Pumpkin Cheesecake Cookies
- Strawberry Cheesecake Cookies
Apple Crisp Mini Cheesecakes
Ingredients
For the Crust
- 1 cup graham cracker crumbs
- 1 tablespoon granulated sugar
- 4 tablespoons butter, melted
For the Cheesecake Layer
- 16 ounces 2 bricks cream cheese, softened
- ½ cup granulated sugar
- 3 tablespoons all purpose flour
- 2 teaspoons pure vanilla extract
- 2 large eggs
For the Apple Crisp Layer
- 1 ½ cups finely diced apple
- 2 tablespoons granulated sugar
- 1 tablespoon lemon juice
- 2 teaspoons cornstarch
- 1 teaspoon ground cinnamon
- ¼ cup all purpose flour
- ¼ cup light brown sugar
- ¼ cup rolled oats
- 2 tablespoons butter, melted
Instructions
For the Crust
- Preheat the oven to 350F and line a standard muffin pan with paper liners.
- In a small bowl, mix together the graham cracker crumbs and sugar. Add the butter and mix until the crust resembles wet sand.
- Add a heaping tablespoon to the bottom of each well in the muffin pan and press the crust into a compact layer. Set aside until ready to use.
For the Cheesecake Layer
- Add the cream cheese, sugar, flour, and vanilla to a large bowl (or the bowl of a stand mixer fitted with the paddle attachment).
- Beat on medium speed for 2-3 minutes or until the mixture is light and fluffy. Add the eggs one at a time, mixing well after each addition. Make sure to scrape down the sides of the bowl as needed.
- Divide the cheesecake mixture between the wells of the muffin pan, filling each one about ¾ of the way full.
- Set aside while you make the apple crisp layer.
For the Apple Crisp Layer
- In a medium bowl, combine the diced apples, granulated sugar, lemon juice, cornstarch, and cinnamon.
- Add a heaping tablespoon of the apple mixture to the top of each cheesecake layer.
- In a small bowl, stir together the flour, brown sugar, and oats. Add the melted butter and stir until a crumble forms.
- Top each apple layer with about 2 teaspoons of the oat crumble.
- Bake the cheesecakes for 38-40 minutes or until the crisp layer is golden brown on top.
- Allow the cheesecakes to cool completely at room temperature in the pan. Then transfer the pan to the fridge and chill for at least 4 hours before enjoying.
Nutrition
This nutrition information is based on the exact products I used in this recipe. Brands and sizes of products could alter exact nutrition and should always be calculated independently.
Like this? Leave a comment below!


Do you have info on making these in mini muffin pans for a party, please.
Hi Nancy, You could make these in a mini muffin pan, but the bake time would decrease significantly. I would start checking for doneness around the 13 minute mark and keep a close eye on them after that. Enjoy!