Thumbprint Cookies With Icing
This post may contain affiliate links, read my disclaimer.
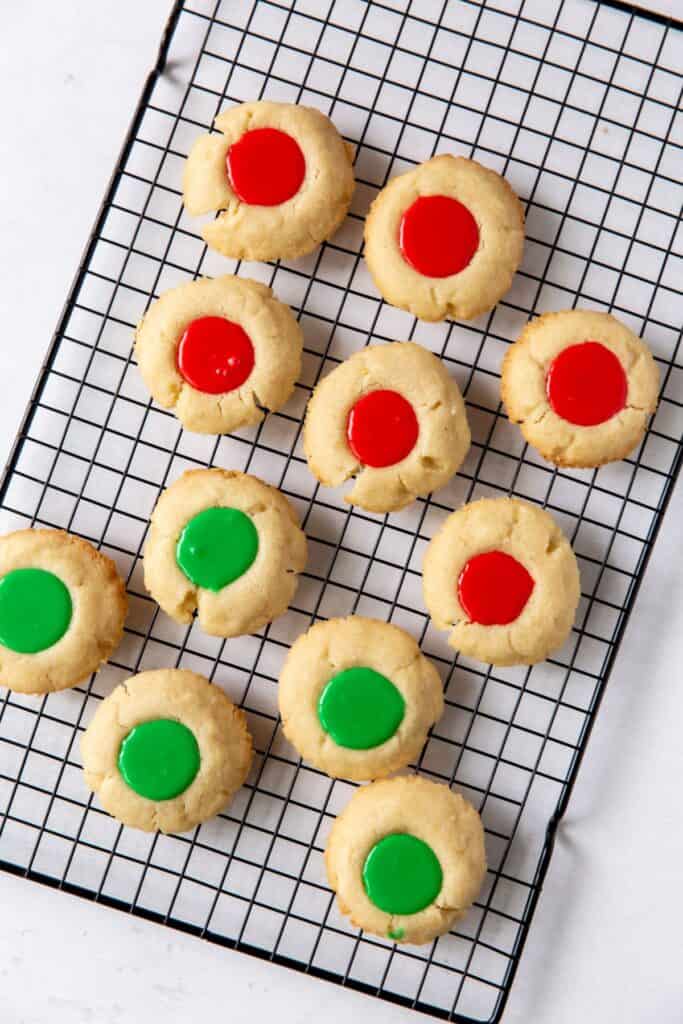
I look forward to making my thumbprint cookies with icing with my kids every Christmas! My recipe for soft cookies with sweet icing is always delicious, and we have so much fun in the process!
My Favorite Thumbprint Cookies Recipe
I started making thumbprint cookies with icing during the holiday season when I wanted a recipe that was more playful than standard jam-filled thumbprints. I was looking for something that felt more like decorating cookies but without committing to full-on icing chaos.
My cookies themselves are delicious, but the best part is definitely filling in the icing centers with my kids! I’ll admit that when they were younger, a lot of icing ended up outside of the center of the cookie (and sometimes all the way out of the kitchen), but it’s always a blast.
It’s amazing how much better at icing they have gotten, especially my daughter Leah.
I love making versions with jam, chocolate, and even caramel centers, but icing is one of my favorites because it lets me and my kids change colors, add sprinkles, and just play around.
Plus, I love how cute my thumbprint cookies recipe turns out. It’s the kind of cookie that makes people smile when they see the tray!
For more thumbprint cookie recipes, be sure to check out my raspberry thumbprint cookies, lemon thumbprint cookies, strawberry thumbprint cookies, and chocolate thumbprint cookies!
Easy Thumbprint Cookies Ingredients
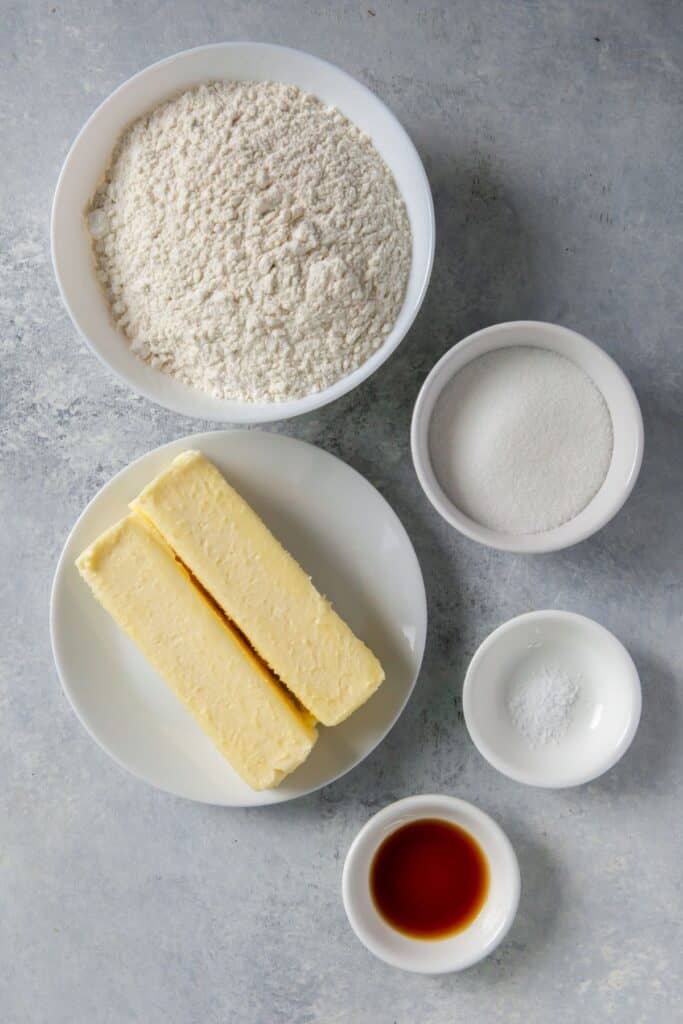
- Unsalted butter – Starting with room temperature butter makes it much easier to cream with the sugar and keeps the cookies tender.
- Sugar – Granulated sugar gives these cookies structure and just the right amount of sweetness.
- Vanilla extract – Vanilla adds warmth to both the cookies and the icing without overpowering them.
- All-purpose flour – This creates a sturdy dough that still bakes up soft.
- Pinch of salt – A little salt balances the sweetness and keeps the flavor from falling flat.
- Powdered sugar – This is the base of the icing and gives it that smooth, classic finish.
- Milk – Milk thins the icing to the perfect consistency for filling the thumbprints.
- Food coloring – Optional, but I like to use red or green food coloring to make the cookies feel extra festive.
HOW TO MAKE Thumbprint Cookies with Icing
A full printable version of this recipe with ingredient measurements is available at the bottom of this post.
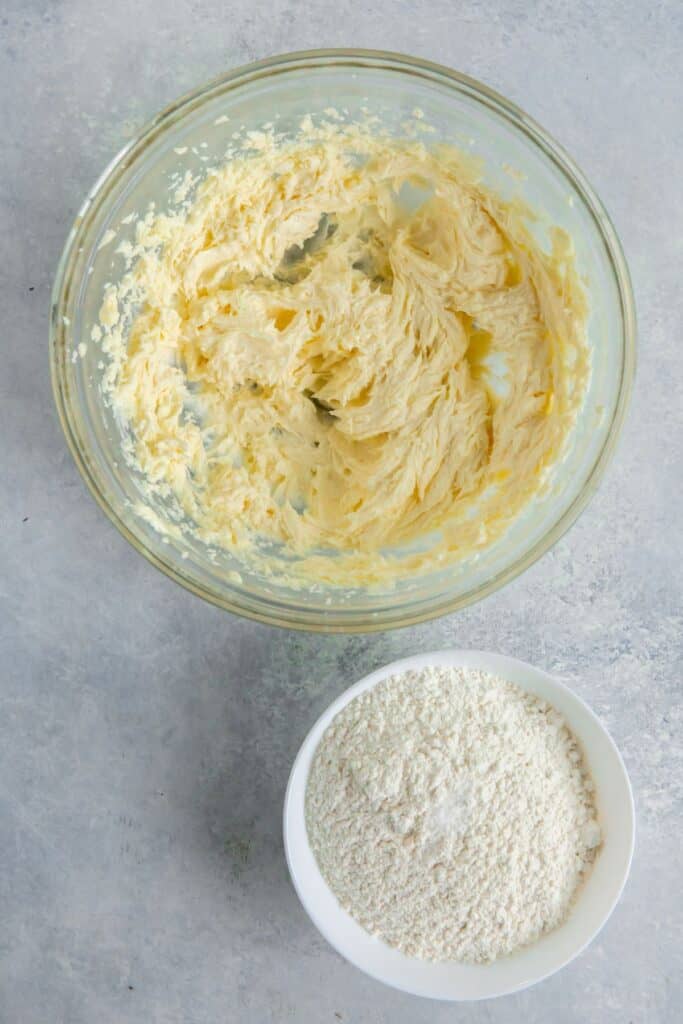
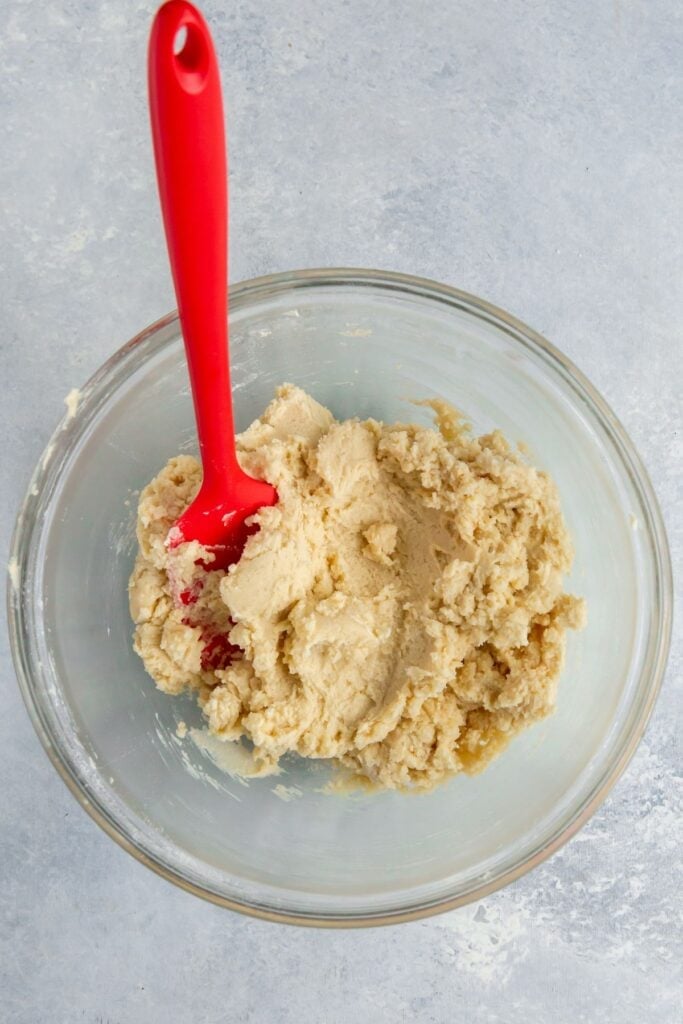
STEP ONE: Cream together the butter, sugar, and vanilla. Slowly add in the dry ingredients. Then cover the dough with plastic wrap and chill it for 1 hour.
STEP TWO: Preheat the oven to 350 degrees F and line a baking sheet with parchment paper.
STEP THREE: Form cookie dough balls. Place them on the baking sheet. I use my thumb or the back of a small measuring spoon to make a small hole in the center of each cookie.
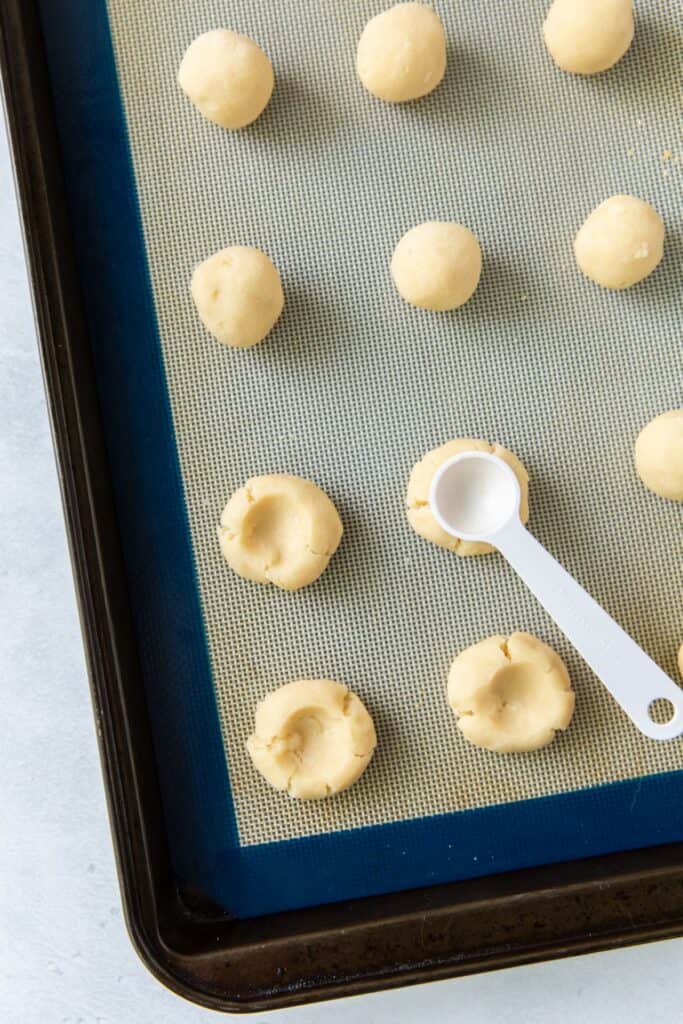
STEP FOUR: Bake them for 10 minutes or until they are slightly firm. Use the back of a spoon to press the indentations again. Place the cookies back in the oven and bake them for another 6-8 minutes. Let them cool for a minute, then place them on a wire rack.
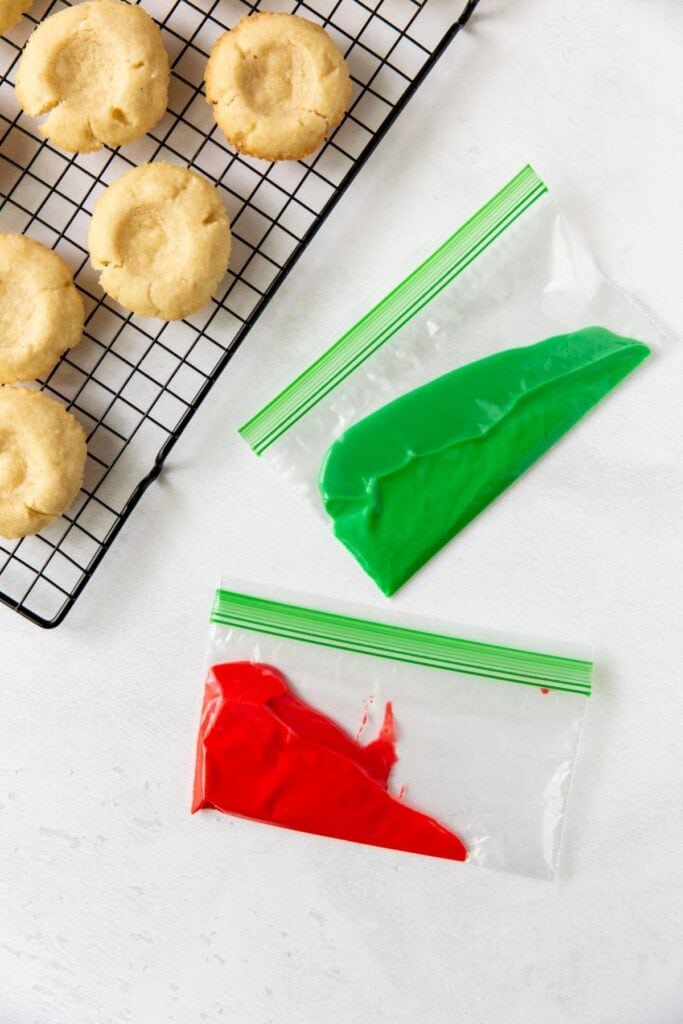
STEP FIVE: Combine the powdered sugar, milk, and vanilla together using a whisk. Half the icing into separate bowls. Add a few drops of food coloring to each bowl, then whisk.
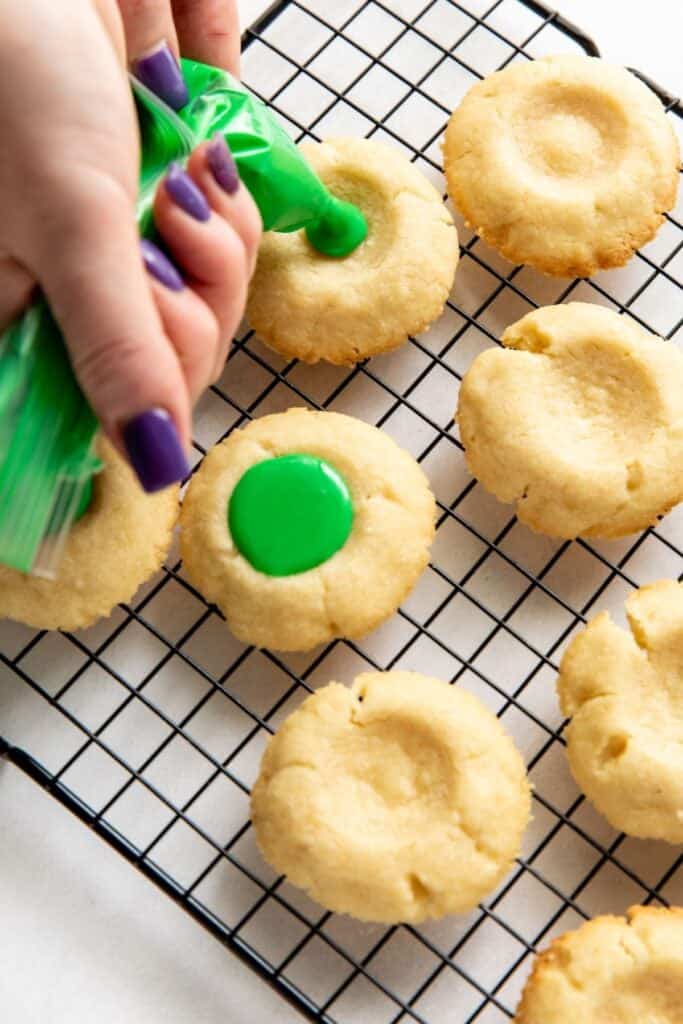
To thin the icing out, add more milk if needed. Place icing in a plastic bag, and cut off the corner. Fill the centers of the cookies. Let them sit overnight to set up.
Tips for the Best Shortbread Thumbprint Cookies
- It’s important to use soft, room temperature butter because it creams smoothly with the sugar. I let mine sit out for about an hour.
- To make sure all the ingredients mix well, I scrape down the sides of the mixing bowl a few times.
- I chill the cookie dough for at least an hour so the cookies won’t spread too much in the oven. This is the key to soft cookies!
- Lining the baking sheet with parchment keeps the bottoms from browning too quickly, plus it makes cleanup easier.
- I always let my cookies cool completely on a wire rack before adding the icing so it doesn’t melt.
- If the icing seems too thick in the piping bag, I add more milk very slowly to make sure it doesn’t end up getting runny.
- I let the cookies set overnight so the icing centers can completely harden.
Thumbprint Cookies with Frosting Variations and Substitutions
- I love switching up the food coloring depending on the time of year or what seems like the most fun.
- For a fun sparkling effect, I’ll sprinkle sanding sugar over the icing.
- I sometimes roll the cookie dough in granulated sugar before baking to add a subtle crunch to the outside.
- To dial up the holiday flavor, I’ll swap some or all of the vanilla extract for peppermint extract in the icing.
- If I’m feeling ambitious, I’ll swirl two different color icings in the thumbprints to get a fun marbling effect.

Thumbprint Cookies with Icing FAQs
How do I keep my thumbprint cookies recipe from cracking?
To prevent cracking, I make sure my batter is fully incorporated before rolling the dough balls. I also press down very lightly with my thumb or a spoon to make the indents. If cracks do form, I just smooth them back together before baking.
What if my icing is too runny?
If I accidentally add too much milk and my icing feels a little thin, I add powdered sugar very gradually until the icing thickens up again.
Can I add sprinkles to my thumbprint cookie recipe with icing?
My kids love adding sprinkles to thumbprint cookies! We either roll the cookie dough in sprinkles before baking or add some on top of the fresh icing after piping it into the center of the cookies.
How should I store my cookies
I store these cookies in an airtight container at room temperature once the icing has fully set. They keep well for up to 5 days and stack nicely with parchment between the layers.

More Easy Cookies and Treats
- Christmas sugar cookies
- Chocolate chip cookie recipe without brown sugar
- White trash recipe
- Christmas crack
- Vanilla crinkle cookies
- Hershey kiss cookies

Easy Thumbprint Cookies With Icing
Ingredients
- 1 cup unsalted butter, softened
- 1/3 cup sugar
- 1 teaspoon vanilla extract
- 2 cups all-purpose flour
- pinch of salt
For the Icing
- 1 cup powdered sugar
- 1 1/2 tablespoons milk
- 1/2 teaspoon vanilla extract
- Red or green food coloring, optional
Instructions
- In a medium bowl, cream together the butter, sugar, and vanilla for 2-3 minutes until fluffy. Scrape down the sides of the bowl, then add the flour and salt and mix until incorporated.
- Cover the bowl with plastic wrap and chill for at least 1 hour.
- When ready to bake, preheat the oven to 350 degrees F. Line 2 baking sheets with parchment paper and set them aside.
- Roll the dough into 1 ½-inch balls, and place 1 inch apart on the prepared baking sheets. Use your thumb or the back of a round measuring spoon to press a small hole in the center of each ball.
- Bake them for 10 minutes, until slightly firm, then remove the baking sheets from the oven. Use the spoon to press into the indentations in each cookie again, then return to the oven and bake them for an additional 6-8 minutes, or until lightly browned. Let cool 1 minute on the baking sheets, then transfer to a wire rack to cool completely.
- In a small bowl, whisk the powdered sugar, milk, and vanilla together in a small bowl until smooth. Divide the icing in half and add a few drops of food coloring to each, whisking to incorporate. Add more milk if needed, but not so much that it becomes runny. Pour icing into plastic zipper bags, snip off a corner, and fill the center of each cookie. Allow to dry and set overnight.
Notes
- Use soft, room temperature butter because it creams smoothly with the sugar.
- Chill the cookie dough for at least an hour so the cookies won’t spread too much in the oven, and for softer cookies
- Lining the baking sheet with parchment keeps the bottoms from browning too quickly, and makes cleanup easier.
- Always let the cookies cool completely on a wire rack before adding the icing so it doesn’t melt.
- If the icing seems too thick in the piping bag, add more milk very slowly to make sure it doesn’t end up getting runny.
- Let the cookies set overnight so the icing centers can completely harden.
- Store the cookies in an airtight container at room temperature for up to 5 days.
Nutrition
This nutrition information is based on the exact products I used in this recipe. Brands and sizes of products could alter exact nutrition and should always be calculated independently.
Like this? Leave a comment below!


These are so good and versatile for any holiday
Love this! This is perfect especially for the kids. Thanks for sharing this!
I love shortbread and usually just bake them with a dusting of sparkling sugar. I love the thumbprint idea! Thanks for sharing!
Delicious and easy! Love these!
Is it ok to put a peppermint kiss in the center instead of the icing when they come out of the oven? Thank you
Hi Pam, yes, you can do that! I would put the kisses in the fridge while the cookies are baking, then place them on top to help them from melting.
can you use salted butter?
Hi Jane, Unsalted butter is always recommended for baking, but you can use salted butter and skip the pinch of salt. Enjoy!
I had a lot of difficulty with this recipe. When I Google thumbprint cookie recipes some have egg in it and some do not. I made this recipe, measured everything to a tea and refrigerated the dough as suggested. It still seemed way too creamy of a texture, but I baked a batch anyway and yes, they all spread out and didn’t raise at all and tasted terrible so how do I fix a big huge bowl of this matter?
Hi Granny, It sounds like the butter was melted and not softened. Melted butter will create dense, flat cookies that spread out during baking. Softened butter will give a lighter cookie with more structure. If your dough it too creamy (you can use the picture under ‘Step One’ for comparison) then try adding small amounts of flour and mix until you can reach the correct consistency. Refrigerate again until the dough is fully chilled, then bake as directed. I hope this helps!
Do you leave them out (like uncovered and exposed on the counter) overnight? Not in an air tight container or ziplock bag? Just want to make sure I don’t dry them out! Thx!
Hi Dana, I leave these cookies out overnight on the counter without any issues. I place them on a wire rack over a clean, flat spot in my kitchen. If you were concerned about leaving them out, you could lightly cover them with a tea towel. I hope this helps!